
A Step by Step Guide on How to Make a Budget in Excel
With all of the apps and software programs that are available now for budgeting, it can be overwhelming to decide which one to use. And if you have ever tried any of them, you might have mentally shut down when it came time to fill it out. Trying to figure out what all of those slots are for is not the easiest thing to do if you have never used that type of budget.
It’s even more complicated if you have never used a budget at all. The good news is that you do not need a confusing or expensive budgeting app. You can create a simple budget spreadsheet in Excel- one that you know how to use because you personalize it for your needs. Follow the steps below to learn how to make a budget in Excel.
Before You Begin
An important note: Not everyone has access to Microsoft Office Excel, but that’s okay. If you do not have Excel, there is a free option: Libre Office. The whole program is designed to mimic Microsoft Office. Download it for free, and then use the Libre Office Calculator as a replacement for Excel.
How To Make a Budget In Excel?
It does not take too much time or effort to make a budget in Excel. Just follow these steps, and you will have a workable and effective budgeting tool in no time.

Build Your Budget with the Budgetry Shop.
Prepare
As with pretty much everything you do, there are a few preparatory things you must do. First, carve out some time. Creating a budget in Excel will not take too long, but it is best if you can do so when there are no distractions. The more you can focus, the quicker you can get it done.
Next, gather your bills, a pen, some scratch paper, and- of course- the device you will be using. A calendar is helpful, too, whether it is a paper or digital one.
Decide On Your Categories
This step is all about building the structure of your budget. This is a foundational aspect of learning how to make a budget in Excel. Before you can go any farther, you need to decide on your budgeting categories, aka your bills.
Everyone’s bills will look different, of course, but the following are common ones. Use this list to help you figure out everything you have to pay, want to spend money on, and want to save for.
Don’t feel too pressured. One great thing about Excel is that you can easily add or take things away once your foundation has been built.
Also, these bills get listed under specific headings, but not everyone will list their bills the same. For instance, for some people, the Internet is entertainment. For others, it is a necessity for work or school, so they list it under housing or even business expenses.
You are welcome to list your bills just as they are below, but you are also free to list and categorize them in any way that is logical to you. This is your budget, after all. Spend the next several minutes looking through the list below and get your categories and bills planned out on paper.
Housing and Utilities
Mortgage/Rent
Electricity
Gas Bill
Water/Sewage
Trash
Maintenance
Taxes
Phones
Internet
Transportation
Car Payment
Public Transportation
Fuel Maintenance
Car Insurance
Other Insurance
Homeowners
Life
Health
Household Items
Groceries
Cleaning
Hygiene
Children
Clothing
School Tuition or Supplies
School Fees
Child Care
Toys/Games
Allowance
Entertainment
Movies
Outings
Restaurants
Loans
Personal Loans
Student Loans
Credit Cards
Future Planning
Retirement
Savings
College Funds
Emergency Funds
Miscellaneous
Makeup
Hair/Nails
Office Supplies
Now that you know what you want to put there, open up Excel to a new workbook. If you have used Excel before, you are probably pretty comfortable with the layout- at least enough to build this budget with relative ease. However, for the sake of those who are not familiar with Excel, we are going to go very slowly and keep it very basic.
You should now be looking at your blank workbook with columns labeled by letters and rows that are labeled by numbers. We are going to talk about how to make a budget in Excel one box at a time.
How To Make a Budget In Excel- Step 1: Name It
In cell A1, you can put your title. Mine says, “Family Budget,” but you can call yours whatever you like.

How To Make a Budget In Excel- Step 2: Categories And Sub Categories
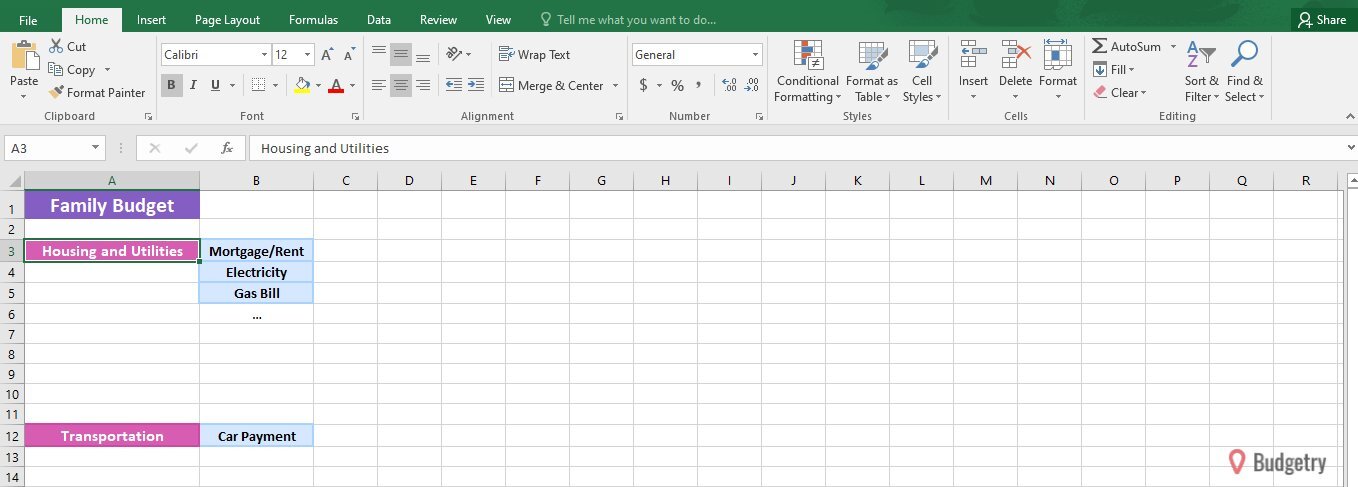
Make your way down to box A3. Starting in A3, you will type in your first category. With our above list, this would be “Housing and Utilities.”
In cell B3, you will type in the first sub category, or bill, under your first category. In cell B4, you will type in the second bill under that category. Continue to make your way down until you have typed in all of these bills.
When you have finished the first list, move onto the next category. Our second listed category is “Transportation.” As “Housing” had nine subcategories, the last would have been typed into box B11. This means that the “Transportation” heading will be typed into box A12. Continue filling in your categories and sub categories until all items you want in your budget have been entered.
How To Make a Budget In Excel- Step 3: Column Headings
You are now going to go back up to box B2 and start entering in your column headings. People do this differently depending on what they want to keep up with. Here are some examples:
Example 1: Months of the year
Example 2: Projected total, actual total, difference, percent of the budget
Personally, I like to keep things very simple, so my columns are B2- Bill, C2- Due date, D2- Planned total, E2- Actual total, F2- Difference, and G2- Balance due.

How To Make a Budget In Excel- Step 4: Fill It In
The next step is pretty simple. You just need to fill in your bill information. The due date and total are spaces for the average amounts you expect to be charged and the regular due date. For instance, if your power bill is regularly about $200 and it is due on the 25th of every month, that is the information you fill in.
When you receive your bill every month, you fill in the actual total you are charged and the difference between those two. Doing so will help you determine if your bills have increased or decreased and will help you decide if you need to cut down or if you are spending more on one thing than you thought. All of this knowledge is helpful when you start to rework your budget, negotiate rates, and more.
For most of your bills, you will end with a $0 balance at the end of the month, as long as you have made that payment. Still, I leave the “Balance Due” column for two reasons. First, seeing all of those zeros at the end of the month is encouraging. It lets me know that all my hard work actually did something for my family.
The second reason is that when you have loans or mortgages, this column gives you a section to keep an eye on the progress you are making. This is not necessary, of course, but it is a great motivation for people like me.

How To Make a Budget In Excel- Step 5: Tweak It
When you create a spreadsheet like this one, you will need to make a few tweaks to make it easier to read and understand. First, click and drag your mouse from box A1 to box G1 to highlight them. In the task bar up top, click the “Merge and Center” button. This will make your title spread across the entire table you have created.
Next, do the same thing for the categories, only this time, you will highlight the boxes going down. In my above example, that would mean that I would click and drag from box A3 down to A11. Repeat these steps for all categories.
After that, take a look at each cell. If any of the words in any of the cells are too long for the cell, you can enlarge the cell. Go to the top of the columns where they are labeled with letters and hover in between the letters until you see the line with arrows. Click and drag it over until the cell is wide enough.
Next, we are going to make the sizes of your words a little different. Click on the title box and change the size of the font to 20. Click and drag from box B2 to box G2, and then change the font to size 14. I usually change the size of the categories as well, but you could just make them bold instead. By differentiating all of the headings, it makes it easier to read what’s on your budget.

How To Make a Budget In Excel- Step 6: Customize
I love planners, spreadsheets, and similar items. They allow you to track things, make plans, and more- all favorites of mine. Probably the thing I like best about them, though, is the ability to customize them, and Excel is no exception. We have already made a few tweaks to the budget spreadsheet to make it more legible, but I like to customize even farther. Doing so helps me to spot what I need to look at easier. The table I am using as an example in this article can be used as an inspiration for your own, but you can, of course, change it to what works best for you!
My biggest customization is always color coding. I choose one color for my title- usually a bright, cheerful color. This helps offset the dread or anxiety I might feel when looking at my budget. Let's just be honest- budgeting can be taxing, especially when you do not make enough.
I then choose another of my favorite colors for my column headings. These colors do not normally mean anything. They are usually just favorites of mine that help me feel good when I see them.
When I get into the categories and sub categories, though, I get a little more intentional. How I do that depends on my current financial situation. If I am making a regular monthly budget with regular financial focuses, such as just paying bills and saving, I keep the colors pretty simple. I choose a color for categories , and then use a lighter shade for the sub categories. This provides a visual divide between my categories.
My favorite color to add, though, is green. Once I have paid a bill, I color that line green. You can just use a “Paid” column that you can put a check mark in, or even strike through the words if you want. However, the green color helps me push myself. I like seeing my entire budget lit up in green, so I will continue to work hard until that happens. The point of customizing is to make the budget more visually appealing and to motivate yourself, so do whatever is necessary to meet these goals.
In addition to color-coding, you can change the font style or even the color of the font. Play around with the formatting until you turn your table into something you love.
How To Make a Budget In Excel- Step 7: Copy
After you have customized to your heart’s desire, it is time to make copies. Highlight your whole table, and then click the copy button on the task bar. Then, at the bottom of the program, you will see a “Plus” sign. Click it repeatedly until you have 12 sheets. On each sheet, paste a copy of your table. Then, right click on each sheet and name it a month so you will have a whole year of budgeting sheets ready to go.
Using Your Budget
Now that you know how to make a budget in Excel, you need to learn how to put it to work for you. The main step will be to check in with your budget weekly and monthly at a minimum. There are two other steps that you can take in Excel that allow you to take advantage of its features.
Calculations
Let’s start with calculations. One very awesome thing about using a spreadsheet for budgeting is that you do not have to do any manual calculations. Start by clicking on the first cell in the column. Then, hover over the lower right corner of that cell until you see what looks like a plus sign.
Click on that sign and drag it down to the last cell in the column. Then, look on the taskbar for the auto sum button- it looks like an “E.” On that drop down menu, just click “Sum,” and the total of that column will show up under the last cell. It is an amazing feature that will cut down a lot of time when budgeting.

Charts
Another of my favorite features in Excel for budgeting is the charts. You can choose between several types of graphs and charts, but the pie chart is what I find most useful. It can show you just how much of your monthly budget is going to each category or bill, which is great when you are trying to decide where in your budget to cut down.
To put this to use, highlight the information in your table that you want to be included. I usually choose the bill names over to the last total. Once you have highlighted your chosen information, click the “Insert” tab at the top. Choose “Charts” from the drop-down menu and then select the pie chart.

Conclusion
As you can see, creating a budget in Excel can be simple and even a little fun. It is certainly cheaper than many other options out there, which is great when you are actually trying to save money in your budget. Before you choose to spend money or time on another tool, try creating your own first.